Purpose
IIS and Web Services are required on server installations to use Web Calendars and Batching in Director.
Prerequisites
-
Must be logged into Windows as a local administrator.
-
All Windows updates must be installed before updating.
-
For French operating systems, installation is not automatic. The region must be changed to US and the machine must be rebooted after updating, to enable .NET 8.
-
If you update a Client from a version earlier than 2024.1, a reboot occurs to enable the needed Windows features required for Batching.
-
If you update from a version older than 2022, it is recommended that you first update to 2023.11 before updating to any 2024 releases.
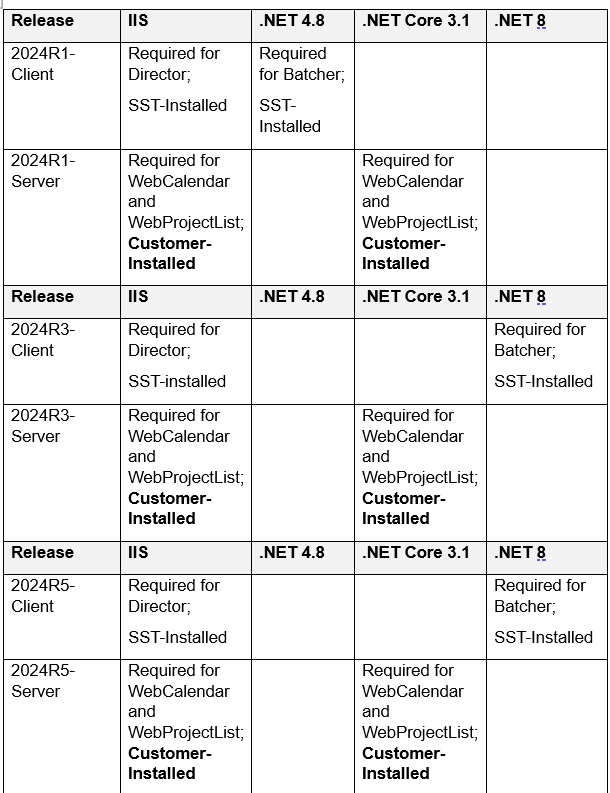
.NET Dependencies
Steps
All new installations and updates are performed using Configuration Manager. See the information below if you encounter issues or contact the Simpson Strong-Tie help desk.
Troubleshooting
Run a web application
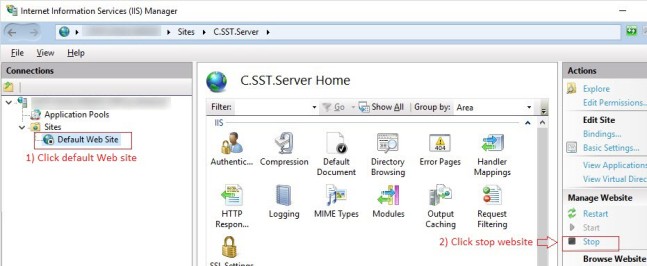
1. Stop the default web app.
2. Select the Default Web Site. In the right-hand navigation pane, under Manage Website, click Stop.
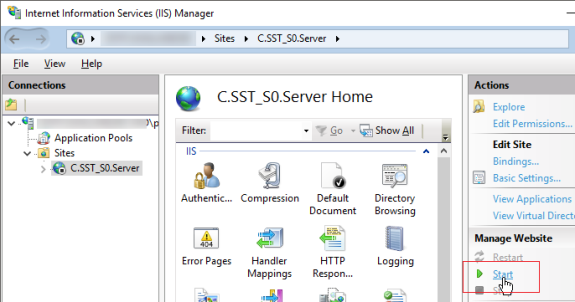
3. Start the C.SST.Server web site
4. Select the SST website. In the right-hand navigation pane, under Manage Website, click Start. You can also right-click to select Manage Website > Start.
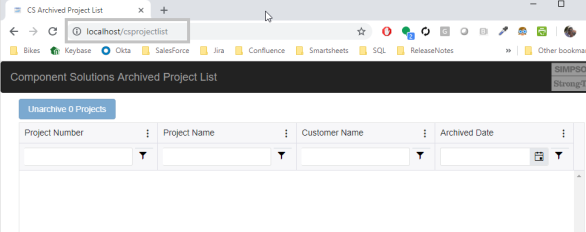
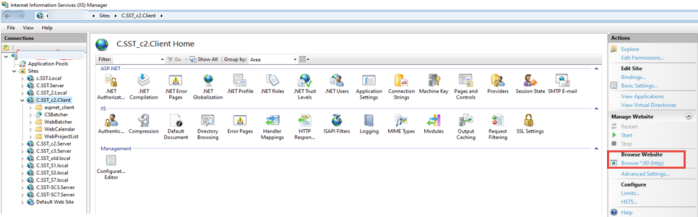
5. Open a web browser and navigate to the application page on the server.
You can see the installed applications from within IIS. You can optionally browse to these applications from IIS by expanding the SST website, selecting the web application name, and clicking Browse *:80 (http) in the right -hand window.

If the application is running on a different machine, navigate to the server machine name in your browser.
For example, for a web app on <OurServer>, navigate to: http://OurServer/applicationName.
In the example below, the Project List web application is running on the local machine.
 Note: You may need to restart IIS in order for this procedure to work properly.
-
Verify .NET 8 is installed by checking the Control Panel.
a. Control Panel > Programs and Features > Search for .net 8
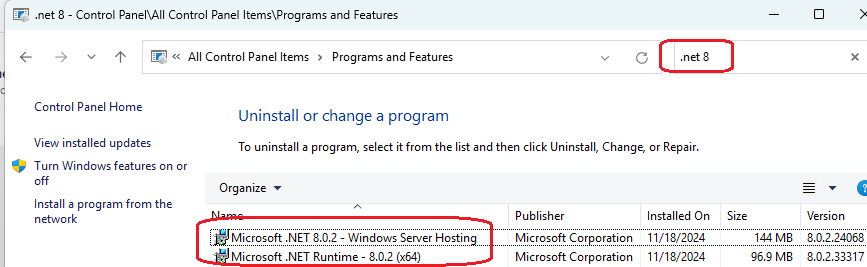
b. Open a command window, type run dotnet --list-runtimes and look for two returned values like “Microsoft.AspNetCore.App 8.0.2” and “Microsoft.NETCore.App 8.0.2” “Microsoft.WindowsDesktop.App 8.0.2”
2. If .NET 8 was not installed, the download may have been blocked. Download and install (as Administrator) the following two files in the order shown:
3. If .NET 8 is installed but an SST software issue appears to be related to it, there could be antivirus or ther policy preventing its execution. Verify with your IT department whether .NET 8 execution is permitted.
Updating to 2024R1
When you update to 2024.1, a script runs to set up Windows features needed for Batching as a web service; this requires a reboot.

Once the reboot is complete, the install on the client will finish. It is recommended that you run a test batch to ensure that Batching functionality has been correctly installed.
Potential issues updating to 2024.1
1. The Batching service attempts to use a port that is already assigned to another application.
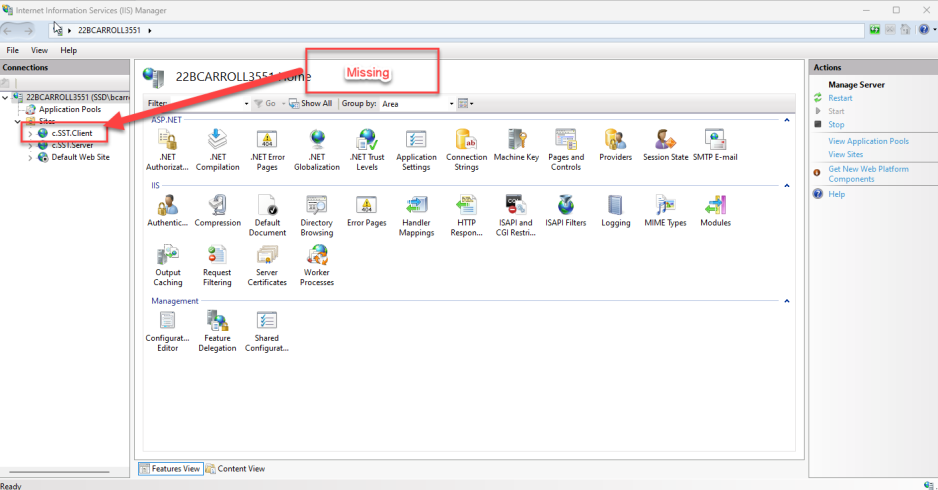
c. Open IIS to determine what services are running and what the port assignments are.
d. Stop extra services and test whether that impacts a port; Batching uses the Client port.
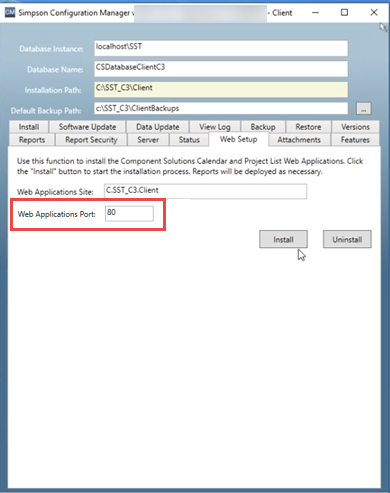
2. The service is sharing a port.
a. Change the port in client Configuration Manager.
b. Return to IIS to verify that the change worked.
3. Enabling .NET Framework 3.5 after enabling .NET Framework 4.8.
a. This may cause issues if you attempt to set up prerequisites for web calendar after setting up Batching.
b. This may cause issues if you set up the client before setting up prerequisites for web calendars.
c. Use the .NET Framework repair tool from Windows to resolve this or try disabling/enabling .NET Framework 4.8. Note that web calendars require .NET Framework 3.5 and Batching requires .NET Framework 4.8. (Configuration manager only installs 4.8).
4. Unable to create folder error message. This may be due to Batcher not having necessary folder access.
a. Give permission for Batcher to write to the folder:
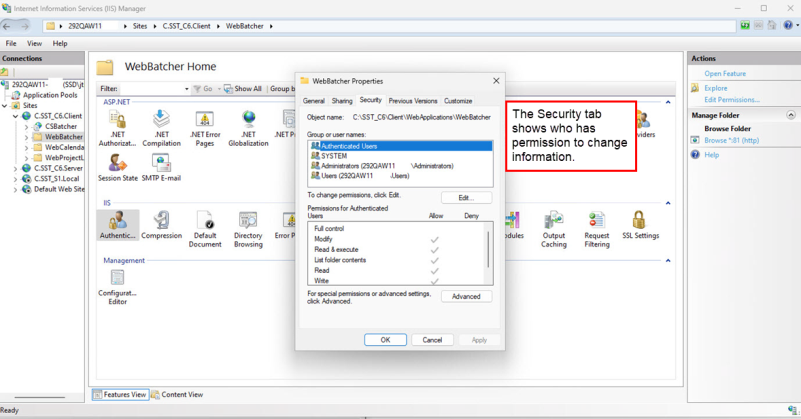
i. Check to see which users have Write permissions for the folder.
ii. Open IIS > Go to the Client option and Edit permissions under Client > Web Application Settings.
iii. In IIS, give authorized Users permissions to Modify.
iv. Return to the folder and add the missing user and give them permission to modify.
This should allow to write the files to the folder.
Resolving User Permission Issues
Because Batching is now a Web Service, there may be user permission issues. To set permissions for a specific user in Windows, follow these steps:
1. Right-click on the file, folder, or drive you want to modify permissions for and select Properties.
2. Navigate to the Security tab.
3. Click on the Edit button to change permissions.
4. In the permissions window, select the desired user or group from the list.
5. Adjust the permissions by checking or unchecking the relevant boxes (such as Read, Write, or Full Control).
Google Drive: Adding Someone to a Shared Drive
1. Right-click on the Shared Drive and select “Add members” or open the Shared Drive and under the search box click “Add members.”
2. Enter the person’s email address and select the access level you want them to have (e.g., View, Edit, or Full Control).
3. Click Send or Add, depending on whether you want to notify the user about their access.
Repair .NET Framework 4.8
To repair .NET Framework 4.8 on your Windows system, you have the following options:
1. Microsoft .NET Framework Repair Tool:
-
Microsoft provides a Repair Tool specifically for detecting and resolving common issues related to the .NET Framework setup or updates.
-
This tool attempts to fix known problems or repair corrupted installations of supported .NET Framework versions.
-
It has an easy-to-use, wizard-based interface and also supports command-line usage with advanced options.
-
You can download the latest version of the .NET Framework Repair Tool from the Microsoft Download Center.
-
Use the tool with options like /q (quiet mode), /p (unattended mode), and /r (repair operation scoped to specific versions)
2. Manual Reinstallation:
-
Open the Control Panel.
-
Click on Programs and Features.
-
Select Turn Windows features on or off.
-
Scroll down and expand the .NET Framework 4.8 section.
-
Check the box next to .NET Framework 4.8 (includes .NET Core 3.1).
-
Click OK.
-
Windows will restart, and .NET Framework 4.8 will be reinstalled
-
For more information, see Microsoft Repair Tool.
Batcher files not found
The message No Batcher Web Application files found to install displays.
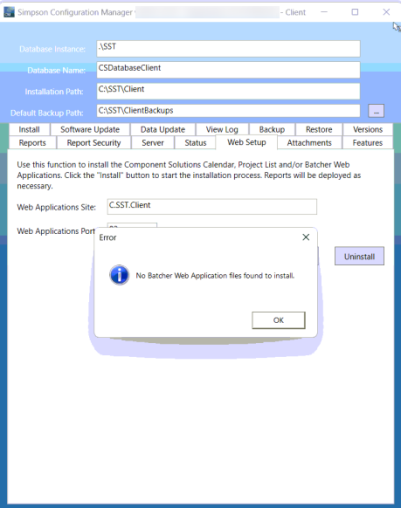
There are two ways to resolve this error.
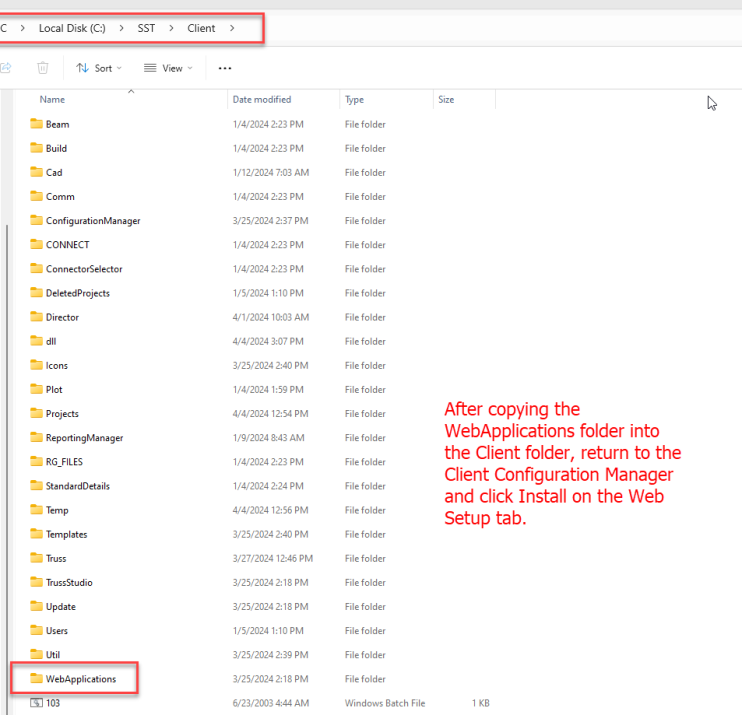
1. Check whether the Web Application folder is missing from the Client folder. If it is, copy and paste a Web Application folder into the Client folder.
2. Verify that the Client\WebApplications\WebBatcher folder contains files.
-
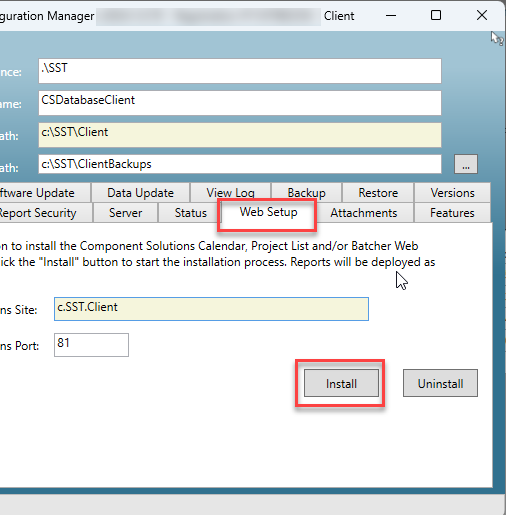
Rerun the Client update.
Additional Information for IT
Batching web application is ApplicationPoolIdentity
NET Core Web Apps:
When running a .NET Core web app, the permissions depend on the user context in which the app runs.
-
If the app runs as a Windows service, it uses the permissions of the service account.
-
If the app runs under IIS, it uses the ApplicationPoolIdentity (e.g., "IIS APPPOOL\\YourAppPoolName").
Grant write permissions to the appropriate user or group (e.g., IIS_IUSRS or the specific app pool identity) for the relevant folder or drive2.
Windows IIS (Internet Information Services):
-
In IIS 7 (and earlier versions), web applications access files and folders based on the account set for the application pool associated with the site.
-
By default, in IIS7, this account is NETWORK SERVICE.
-
In IIS 7.5 (Windows 2008 R2 and Windows 7), application pools run under the ApplicationPoolIdentity.
-
The ApplicationPoolIdentity represents a Windows user account named "IIS APPPOOL\\AppPoolName", where AppPoolName is the name of the application pool.
-
This user is a member of the IIS_IUSRS group, so you need to grant write access to that group
Giving ApplicationPoolIdentity access to network location
The options below describe how to assign ApplicationPoolIdentity to Batcher, providing the ability to write files to a non-local folder, as well as some possible drawbacks.
I. ApplicationPoolIdentity is a LOCAL user (generated by IIS; its identity is not known until runtime) thus any attempt to access anything on the network would result in it using the COMPUTER$ account. COMPUTER = Device name or Full device name.
Using ActiveDirectory, you can grant the COMPUTER$ account access to the files you want.
1. Right Click on the folder
2. Properties
3. Security
4. Edit
5. Add IIS_IUSRS(****\IIS_IUSRS).
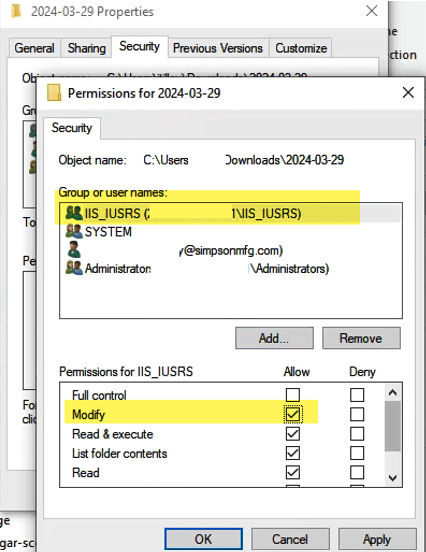
Each Client that needs to batch to the file folder must be added to the permissions.
II. Changing the Identity to the created user or Built-in-account.
1. Open IIS and select Application Pools.
2. Select Batcher and right-click Advanced Settings.
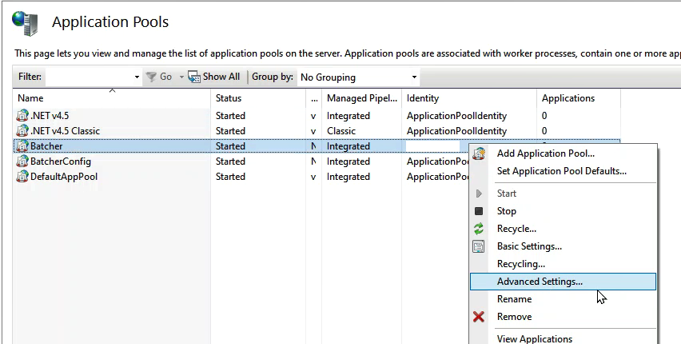
3. Go to Identity and click on the three dots.
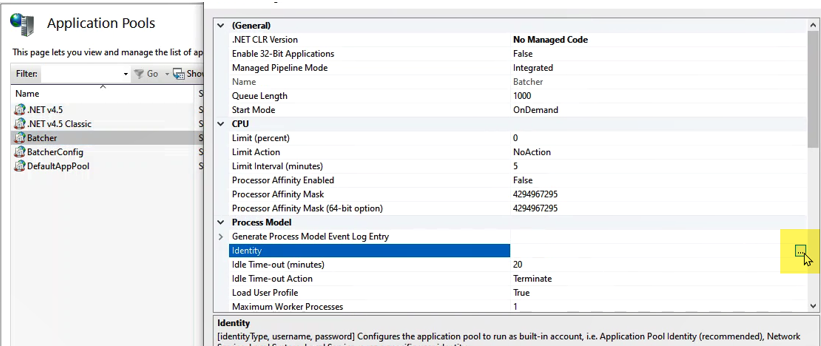
4. Select Custom Account and enter the created User and Password. Then Recycle service for the changes to take effect.
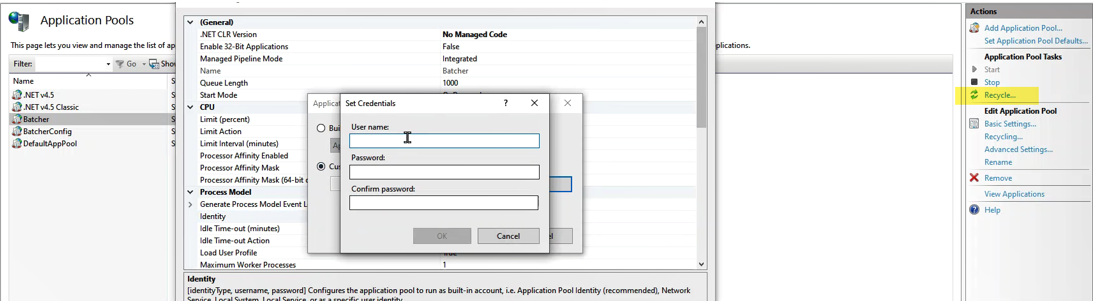
This must be done for every Client using Batching. One consideration with this solution is that if the password or username changes, you must manually edit them to match again.
III. Alternatively, using ActiveDirectory you could create a Domain User account, configure the application pool identity to use that domain user, and grant that user access to the network files.
Create a Domain User Account:
1. In your Active Directory, create a new user account specifically for the application pool identity.
2. Assign appropriate permissions to this user account based on the required access level to network files.
Configure Application Pool Identity:
1. Open Internet Information Services (IIS) Manager.
2. Navigate to the application pool associated with your web application.
3. Right-click on the application pool and select Advanced Settings.
4. Under the Identity section, choose Custom account.
5. Enter the credentials of the Domain User account you created earlier.
Grant Access to Network Files:
1. Identify the network files or directories that the application needs to access.
2. On the server where the files are located, ensure that the Domain User account has the necessary permissions (read, write, or modify) to those files or directories.
• You can set permissions directly on the file system or use Group Policy to manage access.
Test the Configuration:
1. Restart the application pool in IIS.
2. Verify that your application can now access the network files using the configured Domain User account.
This would eliminate the need to change the password.